Learn the psychology of becoming a better salesperson
A big part of succeeding in the world of sales is learning all you can about it and working on your sales psychology. If this sounds like something you’ve struggled with, try out these 10 audiobooks we recommend you listen to so you can get the most out of your time in sales.
These aren’t the only audiobooks out there on the subject of how to sell and sales psychology, but these are certainly 10 of the best. Have you tried audiobooks before? Now’s your time to start investing in yourself and your sales abilities. Check out any of these books on Amazon or Audible with a 7-day free trial.
What are some of the books you recommend for sales professionals?
Sell With the Wolf of Wall Street
Sean Huckstep
Powerful sales lessons from the Wolf of Wall Street
We all know the Wolf of Wall Street story is based on renowned salesman Jordan Belfort. He and his character alike have inspired millions to become better salespeople and to not take no for an answer. If you’re feeling unmotivated or uninspired, here are some lessons from Jordan Belfort aka the Wolf of Wall Street to get you fired up and ready to sell.
The Wolf’s Top 5 Tips:
Don’t take no for an answer.
Just pick up the phone and start dialing.
“Best way to sell something: don’t sell anything. Earn awareness, respect and trust of those who might buy.”
Get More Belfort
If you aren’t familiar with this titan of our industry, check out his youtube channel where he shares dozens and dozens of sales tips, motivation, and techniques in the Wolf’s Den. You won’t be disappointed in his wealth of sales knowledge and motivational tricks.
4 Canvassing Tips for New Sales Reps
Diana May-Jennings
Use these 4 tips to start canvassing right
Are you a new sales rep? Are you nervous to try canvassing for the first time? Well don’t worry, we’ve got you covered. We help experienced and new sales reps and companies learn how to more intelligently track their leads, organize their teams, and stay motivated. So whether you’re experienced or new, these 5 tips will help guide you to success in 2021.
#1 Develop a Strategy
Canvassing without a thought out strategy is like baking a three tier cake when you’ve never baked before. Developing a day-to-day plan as well as an overall plan for canvassing will guide your efforts to more success. If you don’t already, track all the leads you talk to or plan to talk to, this ensures that you don’t double knock or waste your time again with a customer who wasn’t interested in your product.
If you’re a manager, do you organize your reps? If the answer is no, you’re making your job a lot harder. Intelligent team management is a great way to organize and assign custom areas to reps, keep their stats on leaderboards, and message the team all in one place. Evaluate what your canvassing strategy looks like and how you can improve it, this is the best way to be a successful canvasser.
#2 Know Your Customers
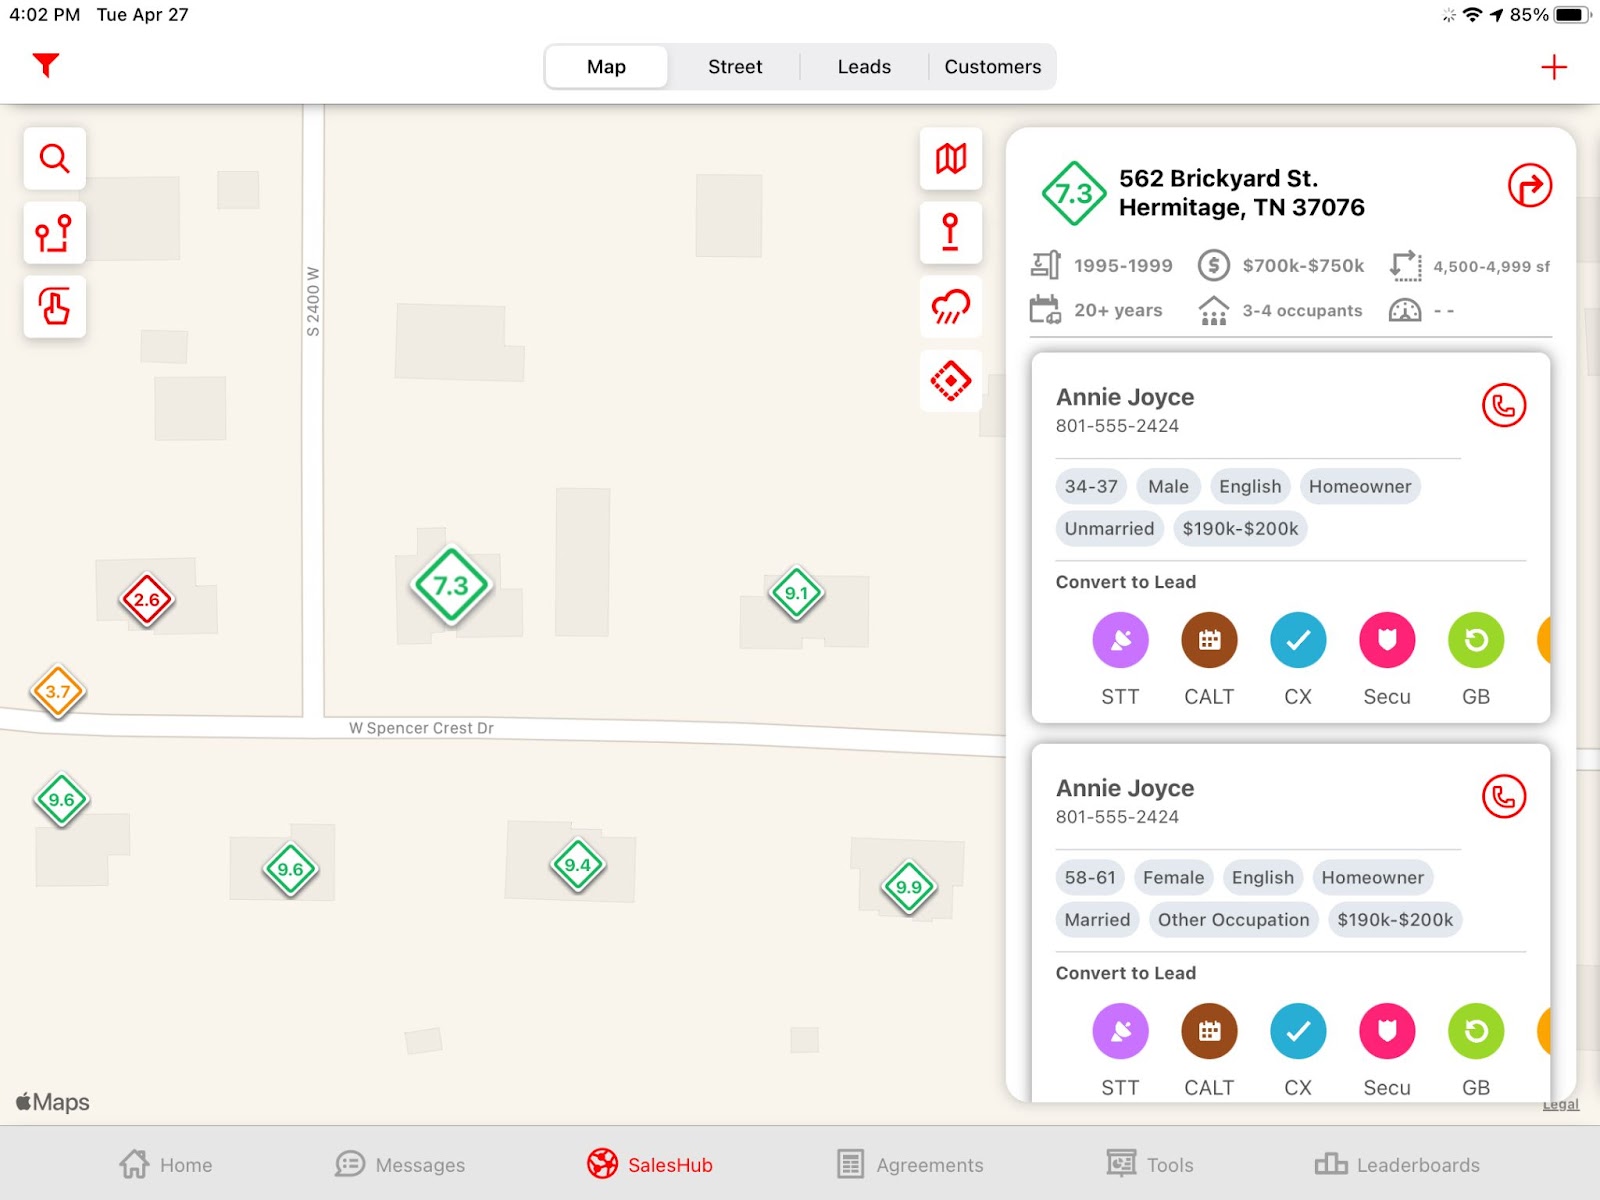
Getting to know your customers happens before and after you knock on their door. We developed a feature to tell you a homeowners name, income, marital status, age, and contact info in any given zip code. This is DataGrid AI. Using this feature will dramatically increase your ability to prioritize areas and hit your target customers first. You set the parameters and criteria your customers have to meet and we give you the best areas to go sell in.
But knowing your customer isn’t just about knowing their income, you have to connect with them in person. When you’re meeting someone you want to sell to, make sure to include light hobbies, interests, and possible common ground as it’s mentioned in conversation or if you happen to notice obvious signs in their yards as you approach their doors. Knowing your customers before and after the door is a great way to ensure they remember you and put a familiar face to the product or company.
#3 Set Goals for Yourself
Canvassing can feel long and drawn out, especially when you are experiencing a prolonged streak of rejection. Sometimes you will want to keep going until you get just one more lead in order to finish on a positive note. Having goals is helpful but you also want to make sure that you push through the hard times of rejection. Instead of expecting impossible numbers from yourself, set realistic monthly or even weekly goals to keep you on track. Once you have reached that goal, stop for the time being and take a break. This will help keep you energized, focused, and motivated.
#4 Stay Optimistic
Door to doorcanvassing can be a challenging activity for many people. Encountering repeated rejection is definitely difficult no matter your profession. But good strategizing, effective tool use, motivated planning, and staying focused on your goals are all ways of negotiating the challenges associated with canvassing. Stick with it and stay optimistic above all and you’ll find success.
What are your canvassing tips?
If you’re still worried or want to know more information about how to canvas more effectively, schedule a free demo with us today and our talented team can tell you all about what it takes to make it in sales. If you’re an experienced rep, share some of your favorite canvassing tips down below for the newbies!
6 Ways SalesRabbit + Pipedrive Integrate
Sam Dearing
SalesRabbit and Pipedrive integrate to form a powerful sales CRM
Pipedrive is a web-based Sales CRM and pipeline management solution that enables businesses to plan their sales activities and monitor deals. At SalesRabbit we pride ourselves on being the go-to sales app that gives companies a new and improved way to lead their teams and now we’ve integrated with one of the biggest CRM’s out there: Pipedrive. See the 6 ways this integration works and how to set it up for your SalesRabbit account.
What does this integration do?
Create an Organization in Pipedrive.
Create a Person in Pipedrive.
Create Notes in Pipedrive.
Create a Deal in Pipedrive.
Send leads to a specified stage in Pipedrive.
Add Custom Fields to Deals in Pipedrive.
What data is transferred into Pipedrive?
Name
Phone
Email
Notes
Custom Fields (Added to Deal)
Pipedrive Integration Set Up
The following steps are required to set up the Pipedrive integration through the SalesRabbit Marketplace. Note: This integration is only available to customers on SalesRabbit’s Pro or Enterprise membership plans. Additionally administrative access is required in order to access API keys and other credentials/settings in configuring this integration.
Part 1: Form Creation
Create a New Form. Make a new section and import the following Lead/Form fields. Note: First and Last Name is required.
Turn on Custom Form Responses
Custom Fields: There is an option to add custom fields to your integration. If you’d like to add custom fields to your integration, please follow the steps below.
Go to settings and then “Custom Lead Fields.”
Set up your custom fields to match whatever is in Pipedrive.
If you want to set up Lead status updates from Pipedrive back in SalesRabbit, create a custom field called “SalesRabbit ID” exactly.
Click on “Publish” Button and confirm.
If you are unsure how to set up Custom Fields in Pipedrive, follow the steps on Pipedrive’s website.
Part 2: Configure Pipedrive Status Update (Optional)
If you’d like to have status updates from Pipedrive back into SalesRabbit, please follow the steps below.
In Pipedrive, login as an Admin and navigate to your Deals section
click on a deal and in the details section click “Customize Fields”.
Next click “Add new field”.
Enter in “SalesRabbit ID” exactly as is shown.
Save the field.
In Pipedrive, Go to Settings>Tools and Integrations> Webhooks
Click “Create new webhook”.
Fill in the information for updating a deal.
click save.
Part 3: Configure Pipedrive Integration
Navigate to the Marketplace under “Integrations”. (Must have admin access)
Select the Pipedrive Integration Card
Navigate to the “Configuration” tab and click “Enable”
Sign into Pipedrive with your Pipedrive account.
Select your form created in step one.
There is an option to map SalesRabbit users to Pipedrive users. Optionally, map the users and select a status for the leads being passed and who has visibility.
Select a default stage to send the leads to in the Pipedrive pipeline or map the status to its corresponding stage.
Select custom fields for SalesRabbit to be mapped to Pipedrive custom fields (Optional). If you want to have status updates from Pipedrive to SalesRabbit, then map your custom field from SalesRabbit to Pipedrive in this step.
Select “Finish” and your integration is set up!
Note: If you wish to disable or reconfigure this integration at any time you can do so by clicking “Disable” or “Reconfigure” respectively. Additionally, if the integration is currently live you should see an “enabled” indicator on the integration.
Your Pipedrive integration should now be live and allow you to create leads in Pipedrive through form submission! If you have any issues or problems please reach out to support or your CSM for help configuring this integration.
Set Up SalesRabbit x HubSpot Integration
If you’re interested in using any of these powerful integrations, any and all of these integrations can be set up through our Help Center portal, the Integration Marketplace or by reaching out to your account CSM or support team at support@salesrabbit.com 801-418-9009.
Assign Sales Areas on iOS and Android
Scott Porter
Check out how to assign sales areas with SalesRabbit
Whether you use SalesRabbit on iOS or Android you can quickly and efficiently assign sales areas. Area management plays a huge role in the success of door to door sales reps. If you don’t properly assign your areas, it will affect every part of the sales process to follow. To learn more about how SalesRabbit keeps your areas organized, check out these exclusive help center articles.
iOS Area Assignment
Please note: It is only possible to assign Areas to individuals assigned to an Office.
If users do not appear in the options once “Edit” is clicked, click HERE to learn how to assign the user to an office, or contact your SalesRabbit Administrator if the access isn’t available on the web app.
To begin, click “Sales Hub” within the lower legend of your screen. Click the finger with the curved line in the upper left hand corner of your screen.
Using your finger or stylus, draw a complete shape on your screen. If you are able to assign to multiple offices, your office options will appear in a pop up at the bottom of your screen. Click the office of the individual(s) you wish to assign to the Area. To assign the Area, click “Edit” in the upper left hand corner of the screen.
Click on the individual you wish to assign to the Area. A check mark will appear to the right of the individual’s name.
If you need multiple reps to work an Area, you have the option to do so. Click “Save” in the upper right hand corner once your selection is ready to be finalized. The Area will appear in the user’s assigned color (assigned via web app > “Users” tab > profile > user color).
To access any Areas you have been assigned to, click the map icon in the upper right hand corner. Click the words “Display My Area(s).” Please note, if you are assigned to multiple Areas, you may click the words multiple times to cycle through each Area assignment. If your company utilizes the DataGrid add-on, please note DataGrid will only appear to those assigned to an Area and logged in to their own account.
If you attempt to assign an Area over a section of the map that contains Leads, you will have a “Lasso” menu appear at the bottom of your screen. Simply click the “Area” option within this menu.
To view existing Areas of other people you have visibility to dependent on your Roles & Permissions, click the funnel icon in the upper left hand corner of your screen. Note: You will always have access to your own areas. The Areas filter is only for other people’s Areas you have access to view, dependent on Roles & Permissions.
Click the word “Areas” to populate the drop down menu. Here you will have the options to adjust the number of users selected (simply click the words “# Users Selected”), or adjust the Date Ranges manually by “From Date” and “To Date,” or (recommended) “Quick Date.” Click “Done” in the upper right hand corner.
Area Assignment Android
Learn to create Areas, assign Areas, and access your own assigned Areas.
Part 1 | Creating & Assigning Areas
1) Click the finger with the curved line icon in the lower right hand corner.
2) If your company has multiple offices, choose the appropriate office.
3) Draw a shape directly on the map. Click anywhere within the Area.
4) Click the plus icon in the upper right hand corner.
5) Click the user you want the Area to be assigned.
6) Once a check mark appears to the right of the selected user, click “Save” in the upper right hand corner.
7) The assigned User will appear now within the “Current” menu. If the user becomes unassigned from the Area, they will appear in the “Past” menu within this screen.
Note: while Areas may be “deleted” by clicking the trash can icon, we do not recommend Areas get deleted if they were worked. This allows companies to create strategic Area management.
8) Once the Area is assigned, it will appear in the User’s assigned color.
Part 2 | Accessing your own Assigned Areas
1) Click the map icon in the upper right hand corner.
2) Click the arrows to the left or right of “Area #/#” – the #/# indicates which Area of how many areas are being viewed. Note: you have the option of clicking the words “Area #/#” to access that Area if it’s not already highlighted on the screen.
3) When you are directed to your Area, it will be highlighted in your assigned color.
4) To turn off the Area color, toggle the “My Area” to the left. Any leads (including DataGrid) will remain within the Area.
Part 3 | Area Filters
1) Click the signal icon in the upper right hand corner. This is your “Filters” menu. Click the arrow to the left of “Areas” to populate a drop down menu after verifying the toggle is swiped right. Note: you will be able to see your own Areas in the app regardless of what the filters are set to; the Areas filters control what Areas are viewed by others within the company dependent on the Roles & Permissions Settings.
2) You will have two variants within the submenu: # of Users selected and timeframe.
Click the Date Range’s “From” and “To” date to enter specific date ranges, or select a “Quick Date” by clicking on the word “Today.”
3) When you use the “Quick Date” by clicking the word “Today,” the menu will populate options for Quick Date ranges.
Once you “X” out of the menu in the upper left hand corner, the map will populate the applicable Areas within the parameters set.
Access our Help Center
If you have different questions you need answered, contact our support team at (801) 418-9009 or email them at support@salesrabbit.com for assistance. Or to learn more about what we can do for you and your sales process, schedule a demo for free. If you’re already a SalesRabbit user, login to our Help Center and get unlimited SalesRabbit resources.
What Is SalesRabbit?
Shawn Jolley
In the competitive world of sales, having the right tools can make all the difference. SalesRabbit stands out as a powerful solution for streamlining sales operations.
The platform offers a ton of useful features aimed at improving efficiency and driving productivity, providing an incredibly useful solution for outside sales teams.
Discover the power of SalesRabbit and see how it can revolutionize your sales efforts.
What Is SalesRabbit?
SalesRabbit is a comprehensive sales enablement platform designed to streamline sales processes for businesses. The software serves as a powerful tool for sales teams, providing them with the capabilities and features necessary to optimize their sales operations and drive better results. In short, SalesRabbit is how outside sales teams get sales done.
Sales Lead & Team Management Made Easy
At its core, SalesRabbit is focused on improving sales performance through various key features. It offers robust lead management functionalities, allowing sales professionals to efficiently track and manage their leads throughout the sales cycle. This includes essentials like lead assignment, prioritization, and nurturing features to maximize conversion rates.
DataGrid AI—Find Leads in Your Industry that Convert
DataGrid AI leverages the power of machine learning and a vast amount of data to pinpoint your industry’s ideal customer profiles.
By analyzing homeowner information, it assigns a Buyer Score to homes, neighborhoods, counties, cities, and states. This intelligent system enables you to quickly identify the specific homes and areas where your ideal customers reside.
With this tool, you can optimize your canvassing efforts and concentrate on areas that promise the highest productivity. With its ability to provide valuable field sales intelligence, DataGrid AI proves to be the best solution for boosting your sales effectiveness.
Streamlined Lead Assignment
SalesRabbit simplifies the process of assigning leads to sales representatives. It ensures fair distribution, eliminating the hassle of manual allocation and potential disputes. With clear lead ownership, teams can work more efficiently and avoid duplication or missed opportunities.
Lead Stacking—Never Lose a Lead
If your sales territory includes apartment complexes or other compact housing areas, SalesRabbit allows you to conveniently stack your leads based on specific locations. This means that you can easily access and manage a list of leads associated with a particular area. By pulling up the lead list, you have the ability to view and edit each lead individually, ensuring efficient lead management within those specific locations.
Lead Dispositioning—Status Set
You can efficiently disposition leads based on their status or outcome. Whether it’s marking a lead as qualified, unqualified, or requiring further nurturing, sales representatives can easily update lead disposition within the platform. This helps in tracking and categorizing leads accurately, providing valuable insights for sales managers.
Sales Team Organization & Notification
You can excel in organizing and notifying your team. SalesRabbit provides a centralized platform where teams can access and update lead information, appointments, and important notes. Sales reps receive real-time notifications for lead assignments, appointment changes, and critical updates, ensuring they are always informed and can take timely actions.
SalesRabbit even works when you’re offline, reconnecting and uploading status changes as soon as an internet connection is restored. This allows reps to continue working in more locations.
Import & Export Leads with No Hassle
Ready for a simple process of importing and exporting data? Sales teams can import leads and other relevant information in bulk, saving time and effort when populating the system. Additionally, SalesRabbit allows users to export data, such as lead lists or performance reports, for further analysis or integration with other systems to do it for them.
Lead-Specific File Attachments
The SalesRabbit platform supports file attachments, allowing sales teams to associate relevant documents, images, or files with specific leads. This feature enables easy access to supporting materials, such as contracts, proposals, or product brochures, which can be shared with prospects or referenced during sales interactions.
One useful example for this feature is to collect and connect digital contracts with leads and jobs.
Custom Fields for Your Industry
SalesRabbit provides the flexibility of adding custom fields to capture specific information unique to your business needs. Custom fields allow you to tailor the lead management process and data collection to match your sales processes and capture relevant details that are specific to your industry or target market. This customization enhances data accuracy and ensures that you have the information you need to drive effective sales strategies.
Enhanced Communication & Collaboration
The app (available on web, iOS, and Android) provides a centralized platform for communication and collaboration among team members. It offers seamless sharing of information, updates, and notes related to leads, appointments, and territories.
Sales Rep Training & Onboarding
The platform, Learn in the SalesRabbit tech stack, also offers tools for training and onboarding new team members. Sales managers can create training materials, share best practices, and provide resources within the platform, ensuring a smooth transition for new hires and enabling continuous learning for the entire team.
Territory Optimization & Route Planning
You can take territory optimization to the next level, giving your sales reps the power to supercharge their territories and routes. With awesome mapping, routing, and territory-balancing tools, this platform helps your sales team maximize their resources and save precious time.
SalesRabbit is like having a secret weapon that ensures you’re always in the right place at the right time, making sales efforts more efficient and effective than ever before.
Say goodbye to wasted trips and hello to sales domination!
Sales Route Planner—Seize the Day
With a sales route planner, you can say goodbye to wasting time in the car. This tool efficiently maps out the most optimal sales route for all your leads, right within the app. No need to switch between multiple platforms or apps like Google or Apple maps—everything you need is conveniently available in one place.
Sales Rep Performance Data & Insights
Another essential aspect of SalesRabbit is its performance analytics capabilities. It empowers sales teams with data-driven insights and reporting features, enabling them to make informed decisions based on sales intelligence. By leveraging these analytics, businesses can identify trends, measure performance, and refine their sales strategies for better outcomes.
Appointment Management & Scheduling
SalesRabbit also offers appointment management, streamlining the scheduling and organization of appointments. With calendar integration, reminders, and follow-up features, sales representatives can prioritize their time and ensure a seamless customer experience.
The Best Solution for Outside Sales
The benefits of SalesRabbit extend beyond individual features for reps. By implementing its sales solutions as a whole, businesses in any sales industry can improve their productivity, enhance sales performance, and foster better teamwork among sales teams.
Weathering the Field Sales Storm: Harness Hail Reports, Maps, and Weather Data
Shawn Jolley
Are you grappling with the arduous task of generating weather damage reports, including hail reports, for your customers’ roofs or houses? We know how time-consuming and draining on resources this process can be, often causing significant slowdowns in your sales pipeline.
Read on for the perfect solution to revolutionize your approach.
Quick Video: Track Hailstorms and More
Use Industry-Leading Weather Reports
Allow us to introduce our industry-leading weather reports, powered by the most reputable names in insurance data.
With our cutting-edge weather mapping, hail reports, and weather reports solutions, we aim to make your life easier by automating and speeding up repetitive and tedious tasks.
So, say goodbye to the days of manual data gathering, painstaking report preparation, and inaccessible data. Say hello to fast and reliable hail damage and weather assessment.
Weather is a native SalesRabbit add-on you can get started with right now.
Fast and Seamless Report Generation
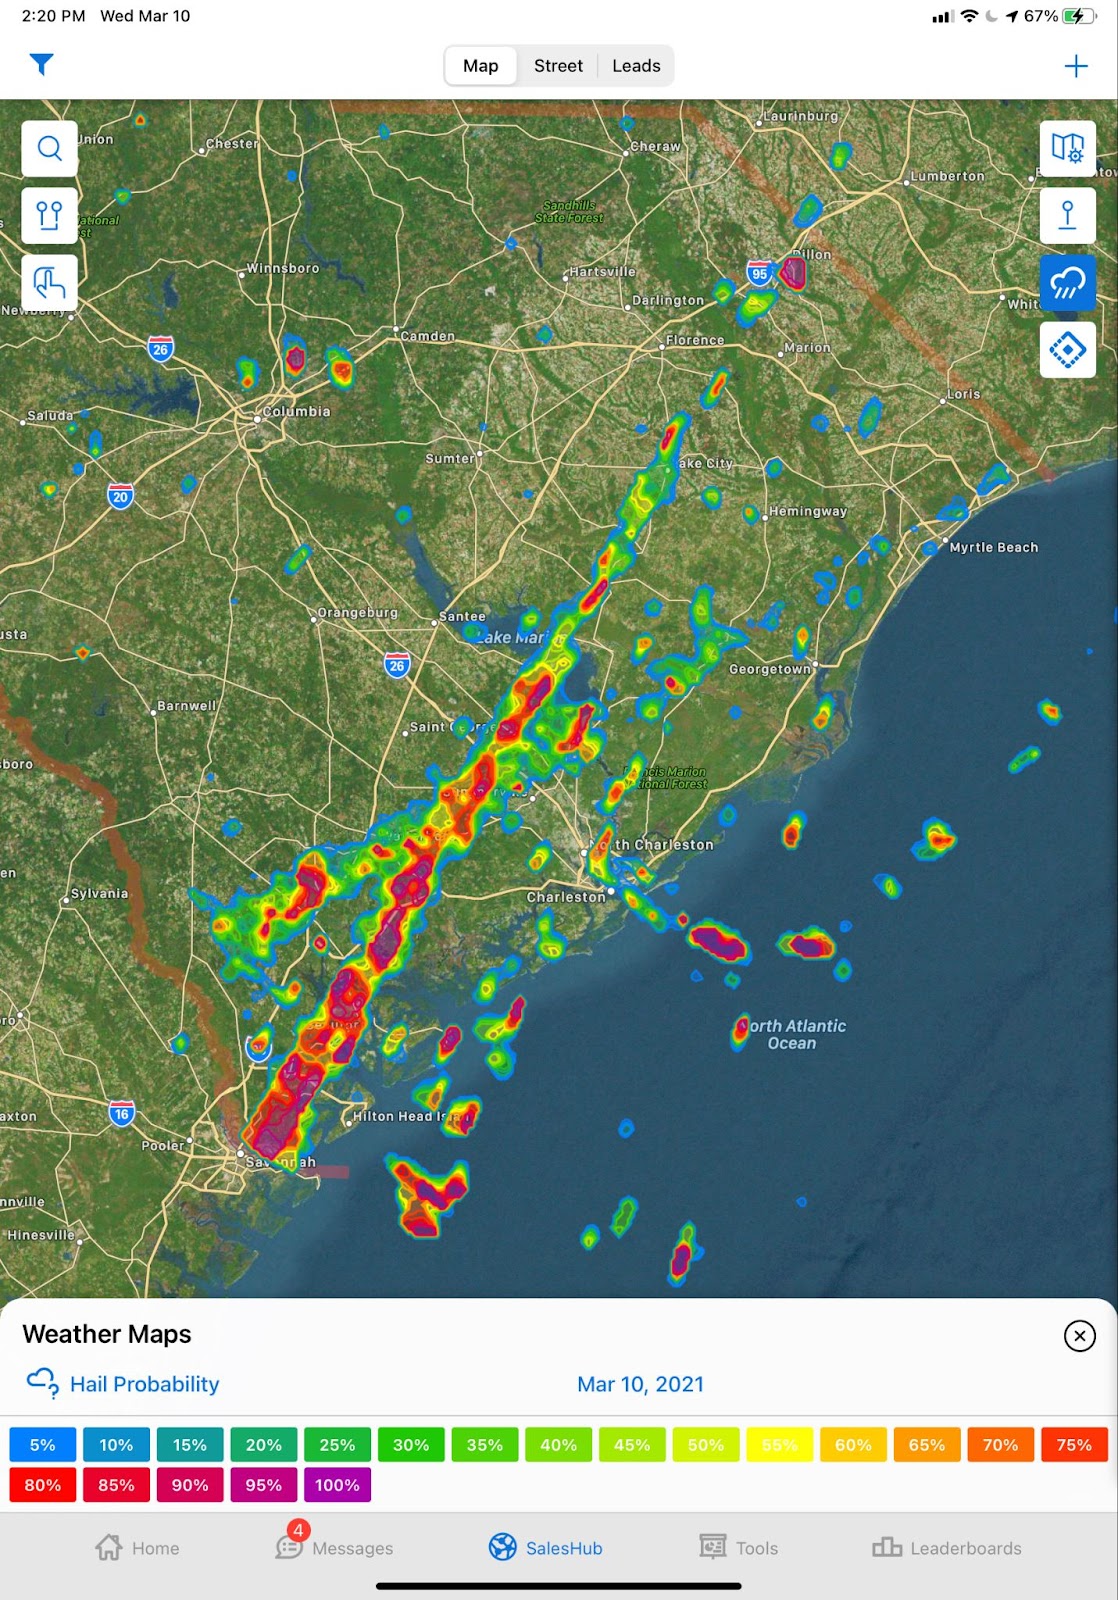
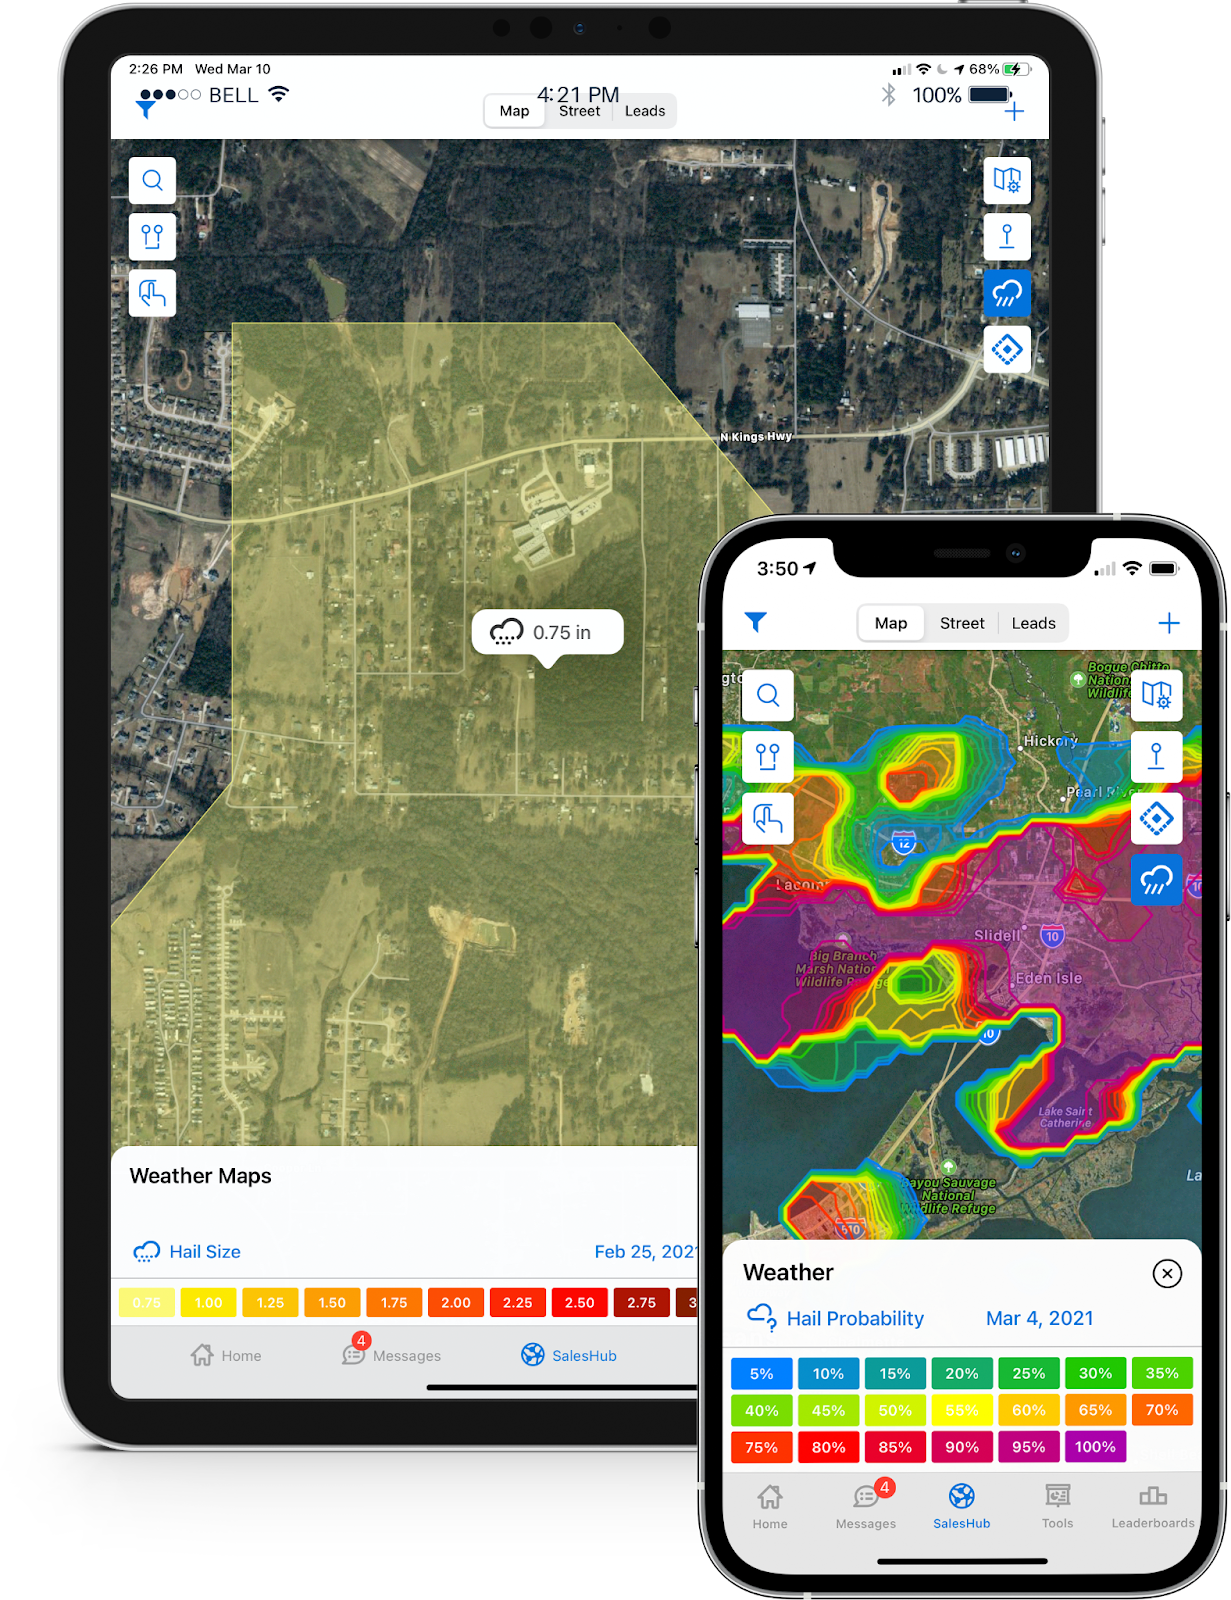
Here’s how it works: we provide lead-specific forensic reports to your mobile device at the click of a button. Simply submit a request, and within seconds, you’ll receive a comprehensive report with all the crucial details. Easily track hail size, probability, wind gusts, speed, and more.
Available Anytime, Even on Weekends
The best part? It’s accessible at any time of day and any day of the week, including weekends. No more waiting around for business hours to get the information you need.
We understand that opportunities can arise at any moment, and we want to ensure you’re equipped to seize them promptly.
Claims-Ready Hail Reports—Hallelujah
Our powerful hail maps are directly powered by insurance data, ensuring that you’re getting the same reliable information as insurance analyzers. This means your reports are claims-ready right away, providing you with a significant advantage in your sales process. This is one reason why Weather by SalesRabbit is the most powerful hail tracker solution for field sales teams.
Wind Gusts and Additional Weather Data
With our comprehensive weather data system, you gain access to a treasure trove of valuable information. Not only can you view real-time data on wind gusts in a specific geographical area, but you also have the advantage of accessing historical data. This historical data gives you valuable insights into past weather patterns and wind conditions, allowing you to analyze trends and make informed predictions.
But that’s not all – we take it a step further. Our platform provides you with future probabilities of wind and hail occurrences. Armed with this foresight, you can be ahead of the game, proactively preparing for potential weather-related challenges before they even happen. This strategic approach ensures that you are always one step ahead, ready to offer your customers swift and reliable restoration services whenever the need arises.
Streamlined Organization
These reports are conveniently saved as exportable PDF attachments that are directly linked to lead information. No more hassle of hunting down reports or manually updating lead data; everything is seamlessly organized for your ease and efficiency with SalesRabbit.
Embrace the future of streamlined sales processes with our game-changing weather reports, hail reports, and mapping solutions. Get ready to witness a remarkable transformation in your productivity and sales performance.
This journey will empower you to boost revenue and leave your competition in the dust, setting you on the path to unparalleled success.
Stay Informed with SMS Alerts
With our advanced system, staying informed has never been easier. You’ll receive real-time SMS alerts, ensuring that you never miss a critical weather update that could significantly impact your sales strategy.
Whether it’s a sudden storm warning in a key sales territory or a hail report indicating potential damage to a customer’s property, you’ll be immediately notified, allowing you to make well-informed decisions swiftly and proactively.
Unlock Your Sales Potential
Step into the realm of sales success with ease by embracing our innovative weather solutions. Don’t let hail reports and weather reports hold you back any longer. Get ready to elevate your business to new heights and exceed your customers’ expectations with every interaction!
Starting today, you can unlock the full potential of your sales process with our unparalleled hail reports, weather reports, and mapping services. With our cutting-edge tools at your disposal, you’ll be able to sell faster, sell smarter, and thrive in your industry like never before!
The Easiest Way to Get Started
Don’t miss out on the opportunity to step into the realm of sales excellence with our unparalleled weather reports. Hop on a personalized demo and experience the power of our industry-leading weather reports. Streamline your sales process, save valuable time for both you and your customers, and take advantage of our SMS alerts to stay informed and prepared.
Use custom lead statuses to keep you more organized
How do you label the status of your leads before and after contacting them? If you don’t have a method for doing this effectively you’re missing out on a more organized sales flow. With SalesRabbit you can create and customize any lead status to improve your organization and efficiency. Here’s how to label your leads and what to consider based on the audience you’re selling to.
How to Edit Lead Statuses
What to Consider When Selling B2C vs B2B
Business to Consumer
Not Home 1 and Not Home 2:Having (at least) two “Not Homes” allows reps to change Leads from one to the other and mark it as an attempt which may be applicable for Leaderboards. Plus, it’s better organization for the reps so they may truly milk a territory and keep track of how many times they tried to reach someone.
Delete “Other”:Deleting “Other” eliminates the temptation to put “Other” generically for everything. The goal is to organize all interactions and eliminate bad habits. So long as you create a well rounded list of Lead Statuses, “Other” will never be needed.
Appointment Set:This one may be a given, but don’t forget to add it if you are setting Appointments through the app.
Referral: Get in the habit of asking for Referrals when you sign deals.
Do Not Contact: Hopefully your team never needs to use this, but in the instance they come across someone your company would not want to do business with, having a way to mark the negative interaction in the app so the person/people may be avoided in the future is the safest route to take.
Contract Signed / Sale: Make it obvious for your reps what a “Sale” looks like.
Lost to Competitor: Keep track of why people choose to go with a competitor to improve your presence in your market.
Business to Business
Change “Not Home” to “Not Available”:Since you are not canvassing residential areas, make each Lead Status clear to your market needs.
Consider any type of Lead source (ie Corporate Lead? Website Lead?):Have a way for your Admins to add in Leads of different sources so you may keep track of the original inquiry when approaching a business that reached out to your company.
Cease and Desist: Consider having a Lead Status where the potential client asked you to never go back to avoid conflicts.
Gatekeeper:Used in situations where you are unable to get past the front desk.
Rescheduled:Have a way to keep track of Appointments that fell through. Please note: If a client is unwilling to place time on your calendar for you and “Go Back” is needed, you may want to consider a different approach to your pitch.
New Contact Needed: Used in situations where the business is a good lead, and your current contact for that business does not have buying decision power.
Access our Help Center
If you have different questions you need answered, contact our support team at (801) 418-9009 or email them at support@salesrabbit.com for assistance. Or to learn more about what we can do for you and your sales process, schedule a demo for free. If you’re already a SalesRabbit user, login to our Help Center and get unlimited SalesRabbit resources.
Stop Mass Emailing: Use 3 New Methods to Contact Customers
Sean Huckstep
Contacting customers can be tricky. When the time comes for you to follow up with your lead, established customer, or prospect, you need to contact them in a way that makes them want to respond. There are 3 options to use from here: Call, text, or email (personal not mass). If you’re unsure of which method to use, it doesn’t hurt to start out with a simple text or phone call and then the customer will usually tell you how they prefer to be contacted. Check out these 3 contact methods and copy + paste examples for each.
#1 Phone Calls
Phone calls are 10x more likely to lead to sales than email. Phone calls are a quick and simple way for you to get ahold of someone and also be a personable rep. If cold calling doesn’t come naturally to you, use these examples or this actual live sales call to help guide you.
Call Examples:
“Hi, is this [Customer’s Name]? Hi, my name is [Your Name] and my name might not ring a bell for you because you and I haven’t met yet. But the reason that I’m calling you is because you were recommended to me by a mutual friend we both know, [Client’s Name]. By chance, did he give you a heads up that I would be calling?”
#2 Casual Text Messages
Phone calls and emails have been a long standing form of business communication but what about texting? It may seem too informal but in 2018 texting was considered the most popular form of business communication to date. Now texting may not be the best option for older prospects, but it still has its place in business. The presence texting has in our data culture, making business texting a viable option when contacting customers; giving you 3 strong ways to start a conversation with your referral. Here’s some quick examples of what to text to your customer or prospect:
Text Examples:
Hi, [First Name). This is [My First Name] from [Custom Field 1]. I just wanted to check in to see if you have any questions about [Custom Field 1]. I’m available for a quick call or text conversation if you’d like. You can text or call me at this number: [My Phone Number]. Have a great day!
#3 Personalized Emails
Emails have been a long standing way for sales reps to get ahold of customers. What you want to avoid with emails are mass and impersonal emails. Use examples like these ones to warm up the customer and create a personal connection. When writing a strong sales email, follow these rules from HubSpot:
I’d like to introduce myself as your resource here at [Your Company Name]. I work with businesses in the [software, healthcare, nonprofit, education, etc.] industry, and noticed you visited our website in the past.
This inspired me to spend a few minutes on [Prospect’s Company] website to learn more about how you’re approaching [X strategy for customer service, sales, marketing, etc.]. I noticed some areas of opportunity and decided to reach out to you directly.
[Your Company] is working with similar companies in your industry, such as [X Company Name], to help them accomplish [Y goals], and giving them the [Z tools/solutions] to succeed.
Do you have 15 minutes to discuss [Prospect’s Company] this week?
If so, you can book time directly onto my calendar here: [Meetings Link]
Looking forward to meeting,
[Your Name]”
Choose Your Contact Method
Whichever of these 3 options works for you, be sure to make it your own. Don’t be afraid to get personalized and give your customer one-on-one attention that will make you a trusted name in their household or company. Remember, not every customer is the same so some may prefer texts or calls over email or vice versa. If you need help updating your sales process and finding the best customers to contact, schedule a free demo with us anytime and we’ll help you make your goals a reality.
Set Up DataGrid AI in 4 Easy Steps
Brady Anderson
Configure DataGrid AI for your SalesRabbit account
This article covers how to configure your DataGrid AI settings and set the roles and permissions for DataGrid AI. These adjustments can be made by an Admin or Owner role.
Note: This feature is only available to companies that have added the DataGrid package to their billing plan. If you would like to add this to your plan, please contact our Support at (801) 418-9009. Custom lead fields are a feature that is available to Pro Accounts or higher.
Note: DataGrid AI area scores are currently only available for iOS. Android support is coming soon.
Set Up Process
Step 1. Access DataGrid AI settings
In the WebApp, Click on “Settings” on the left-hand side.
Then click on “Datagrid AI” This will open your DataGrid AI configuration options.
Step 2. Select your buyer score model
Select the data model that matches your industry.
Custom scores are for Enterprise accounts only.
(To see areas mapped without a buyer score, select “None.”)
Changes on this page will save automatically.
Step 3. Preserving the buyer score (Optional)
If you wish to preserve the DataGrid Buyer Scores after creating a lead from a DataGrid Pin, you can create a custom lead field that will preserve the Buyer Score.
To create a custom lead field, navigate to Settings > Custom Lead Fields.
Create a custom Lead Field by clicking on the “API” field type. Name the field “Buyer Score” or something similar that your users will recognize as the DataGrid AI Buyer Score.
Click “Publish” and then return to the DataGrid AI settings.
In the “Buyer Score Preservation” box, you can now select the custom API lead field that you created.
Changes on this page will save automatically.
Note: If you are on a Team Account, you can preserve the buyer score manually by entering the score into the notes field on leads as you convert them.
Step 4. DataGrid AI permissions
Access your DataGrid AI roles and permissions by navigating to Settings > Roles & Permissions.
There are two permissions that can be toggled for DataGrid AI.
DataGrid Areas – This permission gives the ability to see Areas and Scores that are graded by DataGrid AI.
DataGrid Buyer Scores – This permission gives the ability to see DataGrid AI buyer Scores for individual homes.
The Owner and Admin roles will have both permissions enabled by default.
To adjust the DataGrid AI permissions for other roles, simply select the role, and toggle the permission on or off based on your needs for the other roles.
Want to Learn More About This Feature?
If you’re interested in trying DataGrid AI but still want more information, schedule a free demo with our talented team today to learn everything you need to know and upgrade your account to include this amazing feature.


You must be logged in to post a comment.