
Set up the SalesRabbit and JobNimbus integration in 3 parts
JobNimbus is a Customer Relationship Management tool ideal for home improvement and roofing companies. It tracks your jobs, contacts, and tasks in one simple cloud-based management software. The direct integration is a one-way lead sync from SalesRabbit to JobNimbus, but you may integrate the two systems to be a two-way lead sync through Zapier.
The JobNimbus Competitive Advantage:
- Track jobs
- Manage production & automate workflow
- Powerful budgeting tools
- Notifications on new assignments & tasks
- Time tracking logs
- Backs up data automatically and attaches emails as notes to customer profiles
The Power of the SalesRabbit and JobNimbus Integration:
- Removes the need for double entry
- Reps only need to log in to SalesRabbit, focusing on leads and sales
- Appointment times and lead information sync to the workflow of your choice
- SalesRabbit is ideal for lead tracking
- JobNimbus is ideal for tracking from appointment and/or sales to installation
- Limit which leads enter JobNimbus, allowing a more organized CRM experience
Fields in JobNimbus:
- Workflow Name
- Task Type
- Lead Source
- Name
- Phone number
- Notes
- Appointment Date/Time
- Rep Name
- Status
Integration Set Up
In SalesRabbit (app.salesrabbit.com), go to Integrations > 3rd Party (pictured below) to input your JobNimbus information. Open up a second tab and log in to your JobNimbus account; you will go back and forth between the SalesRabbit tab and JobNimbus tab.

Each of the above fields must be filled out in order to integrate the two systems. Below we will go over each field individually and how to get the needed information from JobNimbus.
- Obtaining the JobNimbus API Token
To obtain the JobNimbus API token to insert into SalesRabbit, click your name in the upper right hand corner and select “Settings.” Within the left hand menu, there is an option for “API.” Generate a New API token for “Sales Rabbit.” Please ensure the “Access Profile” lists “Admin.” “Copy” the API token, and go to your SalesRabbit > Integrations > 3rd Party page. “Enter” the API token where it lists “API Token” in SalesRabbit.

3a. Workflow Name
To retrieve the workflow name, go in JobNimbus to the drop-down in the upper right-hand corner and choose “Settings.”

Choose the option “Contact Workflows” on the left-hand menu.

Take one of these current workflows and edit it so it can be used for SalesRabbit.

Or you can create a brand new one. After editing a workflow or creating a new one; copy the “Type Name” and insert that back in Sales Rabbit next to “Workflow Name” on the “Integrations” page.
*Please note: Lead statuses must be listed exactly how they are listed in SalesRabbit (identical spelling, spacing, capitalizations, etc.).*

3b. Lead Status Matching
Ensure that your WorkFlow has the lead status’ you would like to have synced from Sales Rabbit. For example, if a company wishes to have a status from SalesRabbit called “Customer” (you could do this with any status you would like to sync) sync over, I would need to add it under “Workflow” (pictured below)
To add a status click “Edit.”

Then click “Add Status” in the upper right-hand corner.

Click “+Add Status” when you have inserted the status name.

Note: Repeat this process for every single status you would like to have sync over from SalesRabbit.
- Task Name
Within the left menu, select “Task Type.” On this page, you will need to pick one of the task names to associate all lead submissions with from SalesRabbit. (We recommend “Appointment” for most companies.)

You also have the option of creating a new “Task Type” by clicking “Add Type” in the upper right-hand corner.
Once you have chosen or created your “Task Type” go back into SalesRabbit on the “Integrations” page and put the “Type Name” for your task next to “Task Name.”

- Lead Source
Within the left menu click on “Lead Source.” Pick one to use or create one and then insert that into SalesRabbit under the “Integrations” page next to “Lead Source.”

Part 2 | Enabling Lead Statuses
- Lead Statuses
In SalesRabbit (app.salesrabbit.com) under Integrations, select which lead statuses you would like to integrate into JobNimbus. By checking the box to the left of the lead status name, any lead created in SalesRabbit with that status will be pushed into JobNimbus automatically.
(To learn how to customize your lead statuses in SalesRabbit Click Here)
After you have inserted your integration info, click “Save” in the upper right-hand corner of the page. Once all of the fields have been saved the integration will be ready for use.

Part 3 | Integrating SalesRabbit Users
- External ID
The final step of the integration would be connecting your individual users in SalesRabbit to their accounts in JobNimbus.
JobNimbus: copy the email address tied to the account for each user.
SalesRabbit: Go to the “Users” tab and click on the user you would like to connect. On the left hand side click in the “External IDs” field.

Enter the corresponding email address for the user in JobNimbus and click “+ Add.”
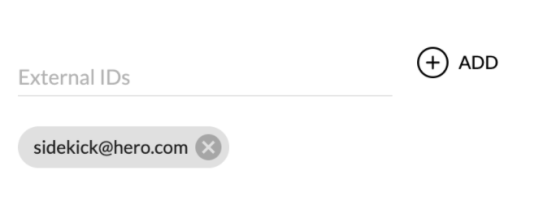
Repeat for all of your users in SalesRabbit that will need to use the integration.
Integration Benefits
- Zapier allows a two way lead sync between SalesRabbit and JobNimbus
- Note: you will need a paid plan because this will require a three step zap
- Zapier will allow Custom Lead Fields to integrate to and from SalesRabbit and JobNimbus
- Two-way sync integrations allows reps to stay up-to-date about the end result of their deals


You must be logged in to post a comment.