
If you struggle with your current lead data process, we’re excited to announce that SalesRabbit and Monday.com are officially integrated within the app and available for you to set up in your account. Below you’ll find more information about Monday.com, what this software integration does for lead data and finally step-by-step instructions on how to set up this integration.
What is Monday.com?
Monday.com is a cloud-based platform that allows users to create their own applications and work management software. Using their software will help you streamline your work for maximum productivity by centralizing all your work, processes, tools, and files into one Work OS. This is also a great platform to connect teams to maintain one source of contact across your organization.
What does this integration do?
This integration can be used to transfer lead data from SalesRabbit to Monday.com with just a few button clicks to greatly improve efficiency by removing the need for multiple data entry. This will save every member of your sales team time, money, and data entry headaches.
How to set up SalesRabbit + Monday.com Integration
The following steps are required to set up the Monday.com integration through the SalesRabbit Marketplace. Note: This integration is only available to customers on SalesRabbit’s Pro or Enterprise membership plans. Additionally, administrative access is required in order to access API keys and other credentials/settings in configuring this integration.
Part 1: Create Custom Lead Fields in SalesRabbit (optional)
If you have custom fields for leads that you’d like to pass over to Monday.com this section will be helpful, otherwise you can skip to Part 2.
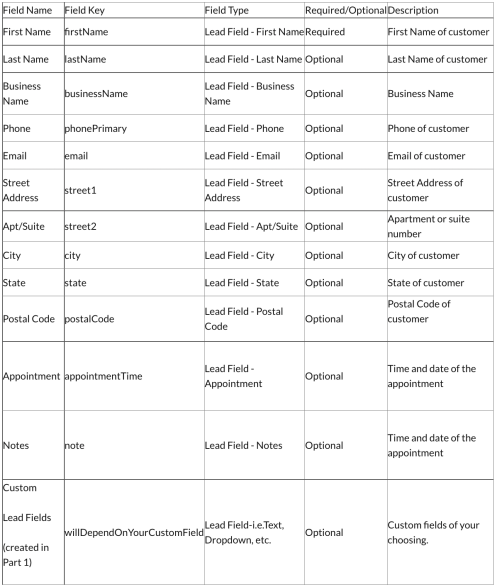
Add the following custom lead field under Settings > Custom Lead Fields

Click “Publish”.
Part 2: Form Creation
Create a New Form under Settings > Form Builder.

Turn on Custom Form Responses:

Once the changes have saved (visible near the top right corner), click Publish.
Part 3: Set Up Columns on Your Monday.com Board
You’ll need to set up all of the columns with the correct titles in order for them to map properly with what’s in SalesRabbit, by default all of these will send over as long as you have the appropriate field on your form and column in Monday.
If you click on the “+” icon to the right of your board you should see the menu below. You’ll be using mostly “Text” but you can also use Status and Date for the Status and Appointment columns.

Status and SR ID don’t need to be included on the form as we pull those straight from the lead.
Here are the column title’s you’ll need to include, please be sure to match the names (you can include as many or as few of these as you’d like):

*Status column: In order for the statuses to work properly you’ll want to make sure that whatever status options you set it matches the status name options in SalesRabbit.
*Appointment column: Be sure to add the “Always keep add time option on” as seen in instructions below:


*Custom fields should all be set to text but you can also set them to a dropdown (along with a dropdown in SalesRabbit) as long as the options in SalesRabbit match the other options.
You’ll map the custom fields between the two systems in the next step.
Sample:

Part 4: Configure Monday.com Integration
Navigate to the Marketplace under “Integrations”. (Must have admin access)
Select the Monday.com Integration Card.

Navigate to the “Configuration” tab and click “Enable”
Select the published form from the dropdown list, click Next.

Now connect your Monday.com account using your API Key (below are instructions are retrieving that). After connecting your account, click “Next”.

Here’s how to retrieve that API Token:
Go to your Monday.com account and click on your profile icon in the bottom lefthand corner> Admin > API > Generate an API Token and then copy it.


Select the board that you’d like to use for the integration.
If you’d like to, you can map Custom Fields from your SalesRabbit form to Custom Fields in your Monday.com account. On the left hand side, you can add the SalesRabbit fields and select them from the dropdown. Monday.com custom fields will be on the right hand side.
To complete the set up, click “Finish”.

Note: If you wish to disable or reconfigure this integration at any time you can do so by clicking “Disable” or “Reconfigure” respectively. Additionally, if the integration is currently live you should see an “enabled” indicator on the integration.

Your Monday.com integration should now be live and allow you to send leads along with custom fields to Monday.com! If you have any issues or problems please reach out to Support or your CSM for help configuring this integration.
Set Up More Integrations
If you’re interested in using any of these powerful integrations, any and all of these integrations can be set up through our Help Center portal, the Integration Marketplace or by reaching out to your account CSM or support team at support@salesrabbit.com 801-418-9009.


You must be logged in to post a comment.